My followers

Posts tonen met het label Tracks and Wheels. Alle posts tonen

donderdag 15 november 2018

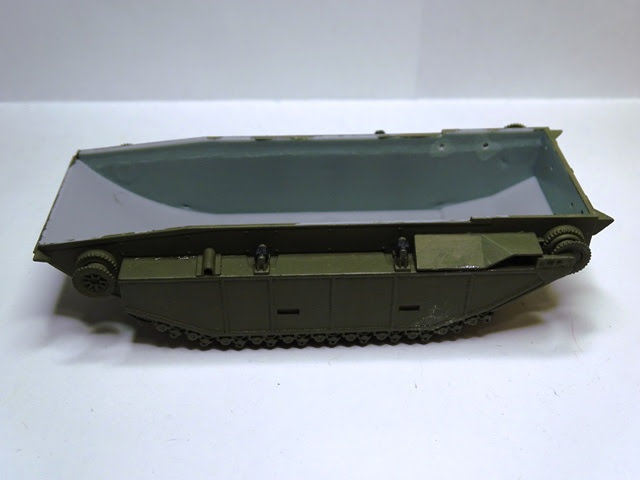
Dragon LVT-(A)4 WIP 002

Today I present step 3 and 4 from this work in progress. It has been a while but I really have been busy with this project. Not as busy as I would like but I can't change that anymore.

As you can see I'm still working in the base color of this tank and I haven't paiinted one of the details yet, except for the wheels. Later on this project I will use some bottles of AK, which I bought at FIGZ Arnhem this year, after following a workshop. And on the latest CRISIS, I bouoght some more.

Step three


This is a part of the upper hull with lots of tiny pieces to at. I lost some on the floor, because they were to tiny for me. I work a bit different since then. Now I add a little piece of blue tape to the part before I cut it from the sprue. Works fine for me, and when it falls of the table, I'm able to find it back!


Pictures are a bit blurry, but that's because I used my old camera. Next time I will use my other one again.

Step four


Second part of the upper hull.


Next picture is what is called a dry fitting. Just to see how it looks so far. Glueing is for later.

Paints used so far:

- Revell 46 Nato olive
- Revell 09 Anthracite

Here are also some pictures of the figures that will join this tank. One has his foot broken, but he insisted to stay in the show. Inside the tank you will not see that.


See you all in the next episode.


Welcome to my blog!!!!!

zondag 22 april 2018

Dragon LVT-(A)4 WIP 001

Cause of a comment I gave in this topic on Benno's Figures Forum I recieved a very nice model of this tank from Frank Krüger, better known as Hellboy on the forum. Thank you Frank! The only condition he gave me is that I really would make the model and show it on the forum. You can find all the work of Frank, on this location http://www.hellboy-miniatures.de/ .

Now as you can see in the history of this blog, is that I don't make many kits like this. But I like the challenge, and as I never made a Dragon kit, I would like to find out how good or bad this kits are. So I started working on it last year in November. And now I show you how far I am at this very moment.

I will try to show it step by step like show on the building instructions included by the model. Today it will be step one and two. The next steps will follow soon I hope, because I would like to finish it before the FIGZ meeting in Arnhem, Sunday June 3th 2018. There will be a weathering workshop and this model looks like it could need some of that!

Let's start with the box art. It shows the model in a Pacific theatre. The figures shown on the box are not included, but Frank was so kind to include two figures, some stowage and an aerial to complete the model. Thanks again Frank!


Step one


These are the two side pieces with all the wheels on. Not much to glue here but a lot to paint. To be complete, I don't have an airbrush, so I paint all with brushes.

Paints used so far:

- Revell 46 Nato olive
- Revell 09 Anthracite


Step two


Adding the rest of the bottom of this tank and some more small parts. Again a lot of brushwork, three layers were needed to cover the surface. But I'm pleased with the result so far.


Looks like I will have to do some retouching on some parts. But no problem, we will do that with a smile!

See you all in the next episode.


Welcome to my blog!!!!!

zondag 22 mei 2016

Arnhem Groupe Build Project Finished!

Not been very busy on blogger this week but I really wanted to get this project to an end. When I realised this week that there were only three weeks left for the event I pushed up the speed a little bit. Now I can say that it is finished and ready to be posted to the one who is making the whole diorama. I also wanted to finish something else but that is for later on this week.
Global picture off the finished vignette!

What did I do this week? First I did a little set-up to see how everything fits on the base. Then I drilled some holes in the base for placing the poles from the plates in with some wood glue. Next I added the mix of woodfiller with sand an brown paint over the whole base and I placed the checkpoint cabine. It had to dry for at least 24 hours so it would become very hard. Here is a picture off the result so far.


Next I painted the base completely with a dark brown from Revell. Then I drybrushed with GW Graveyard Earth, Revell Beige and GW Kommando Khaki. Then I placed some bushed made from Woodlands Scenic folliage, flowers from Greenline and Miniatuur and some grass from Games Workshop.

The tank was something tricky to place on the base. I had just enough place to get it on it. From the back off the tank to the front of the cannon is just 10 cm, the lenght of the base! At that moment I decide not to glue the turret so it can be moved a little bit to left or the right. Last step was adding the figures on the tank. They are all placed with wood glue so that it will invisible when it is dry.


Now it is time to reveal what is on the plates I placed. Maybe some of you remind that I wanted this tank to pass the border between Belgium (Lommel) and the Netherlands (Valkenswaard). Here you can see how I symbolised the border.

Flag of Belgium!

Flag of the Netherlands!

And because this is made for a very special event in Arnhem I added also a sign to let them know what direction they have to take.

Yes, that's the direction!

That's the story off this little piece of work. Here are some more pictures from other angles so that you get a good view off how it looks like. I hope you all like the final result.


So if you want to see this work and many others that members of Benno's Figures Forum have made for this project come to Arnhem on the 5th June. Here I give once more the information of this event.


FIGZ

Wargaming & miniatures event in the Netherlands

Sunday 5 June 2016, Arnhem (NL)


In the next days I will be active on blogger again. And later on this week I will post some figures I painted last week, and I have to blame someone for that. But as said that is for later on this week!


Welcome to my blog!!!!!


dinsdag 2 september 2014

Revell 3232 Sd.Kfz. 173 Jagdpanther and a Give Away

I'm not really a model maker, but sometimes I make something just for fun. This one is from Revell but original from Matchbox. I didn't build and paint the scenery included in the box, because the model is going this way in my showcase. I used the boxart for painting it. The cammo is from an unknown unit on the Western Front in Germany, spring 1945. Cammo colours: Ochre matt (revell 88, covered with green wash), Reddish brown matt (revell 37) and white. Tracks were done with rust matt (revell 83) and steel metalic (revell 91). The whole model is covered with some tamiya weathering powder sand.


I hope you like it.

And then about the Give Away. Edwin King is doing one on his blog Thougts of a Diplomatist. I all advice you not go over there because I need some things of his list very badly. If you think this isn't a good advice, just use the link and say something nice to Edwin!

Also welcome to a new follower:
- Dirk (I couldn't find a blog so if you have one please let me know the link)

Welcome to my blog!!!!!

zondag 16 september 2012

Somewhere in Arabia!

This was one of my contributions at the Meeting in Mol Belgium! I called it somewhere in Arabia, because I didn't want to point out a specific place or country!

You will recognize things I showed in previous posts like the Nikolai Arab Civilians On The Road and Nikolai Arabian House both sculpted by Erik Trauner and can be found by Germania Figuren.

The Revell 03147 HMMWV M966 Tow Missile was also shown in a previous post, and as you can see I managed well to camouflage that there are no windows in the car. The Americans will be subject of another post.

I didn't win a price, the other contributions were to big!

Enjoy the pictures!


I hope you like them!

Welcome to my blog!!!!!